My new toys = berry + bread, lol

Attended Raspberry Pi workshop today, learned Raspbian, Python programming, solderless breadboard, 7 segment numeric LED display…
One step further in exploration, one step closer to invention.
My new toys = berry + bread, lol
Attended Raspberry Pi workshop today, learned Raspbian, Python programming, solderless breadboard, 7 segment numeric LED display…
One step further in exploration, one step closer to invention.
Synopsis
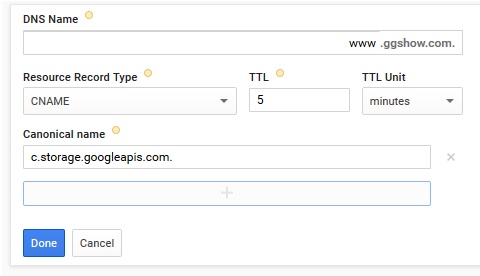
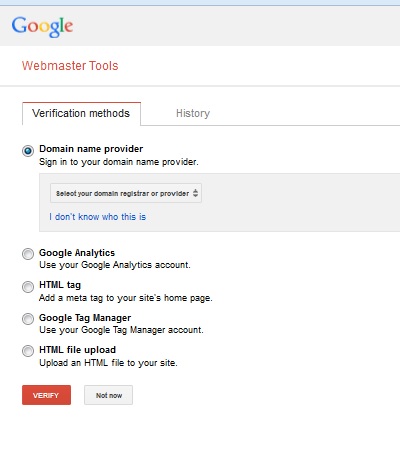
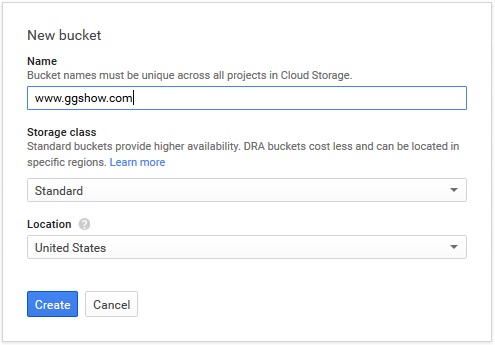
Requirements
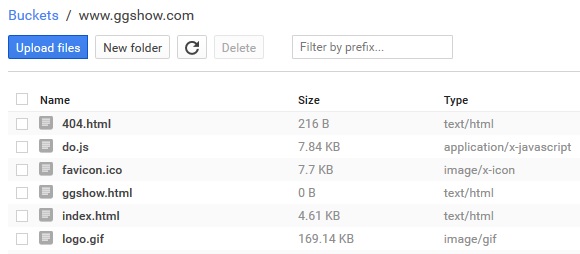
Steps
Useful gsutil / gsutil.py commands
You can also change file permission and website configuration using gsutil command.
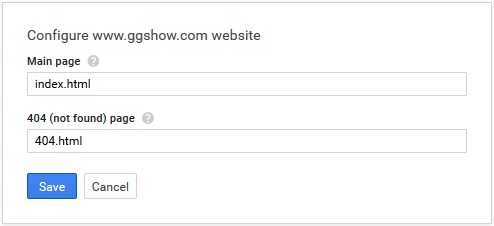
Configuring main page and custom 404 page:
gsutil web set -m index.html -e 404.html gs://www.ggshow.com
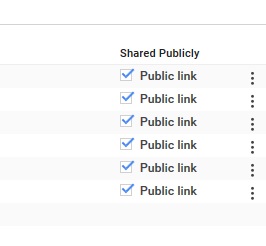
Enabling public read file permission for a single file:
gsutil acl set public-read gs://www.ggshow.com/file.html
Enabling public read file permission for all files in bucket:
gsutil acl set public-read gs://www.ggshow.com/*.*
Uploading local files to bucket
gsutil cp -R \var\www gs://www.ggshow.com
Copying an object (file or folder) from one bucket to another bucket
gsutil cp -R gs://www.ggshow.com/object gs://mybackup.ggshow.com
Moving files from one folder to another folder
gsutil -m mv gs://www.ggshow.com/folder1/*.* gs://www.ggshow.com/folder2
List files in bucket
gsutil ls gs://www.ggshow.com
Reference
A quick solution to convert webpages into black and white using CSS grayscale filter, supported by all major web browsers including MSIE, Firefox, Chrome, Safari. Suitable for making mourning page, paying tribute, & etc.
Convert the entire page into black & white:
body {
  filter: url("data:image/svg+xml;utf8,<svg xmlns=\'http://www.w3.org/2000/svg\'><filter id=\'grayscale\'><feColorMatrix type=\'matrix\' values=\'0.3333 0.3333 0.3333 0 0 0.3333 0.3333 0.3333 0 0 0.3333 0.3333 0.3333 0 0 0 0 0 1 0\'/></filter></svg>#grayscale");
  filter: gray;
  -webkit-filter: grayscale(1);
}
Convert selected elements into black & white:
.grayscale {
  filter: url("data:image/svg+xml;utf8,<svg xmlns=\'http://www.w3.org/2000/svg\'><filter id=\'grayscale\'><feColorMatrix type=\'matrix\' values=\'0.3333 0.3333 0.3333 0 0 0.3333 0.3333 0.3333 0 0 0.3333 0.3333 0.3333 0 0 0 0 0 1 0\'/></filter></svg>#grayscale");
  filter: gray;
  -webkit-filter: grayscale(1);
}
And add grayscale class to selected HTML elements. E.g.:
<div class="grayscale">
 ...
<div>
Print webpages in black & white:
@media print {
  .grayscale {
    filter: url("data:image/svg+xml;utf8,<svg xmlns=\'http://www.w3.org/2000/svg\'><filter id=\'grayscale\'><feColorMatrix type=\'matrix\' values=\'0.3333 0.3333 0.3333 0 0 0.3333 0.3333 0.3333 0 0 0.3333 0.3333 0.3333 0 0 0 0 0 1 0\'/></filter></svg>#grayscale");
    filter: gray;
    -webkit-filter: grayscale(1);
  }
}
CDN options
CSS also available on CDN.
Grayscale all:
<link rel="stylesheet" type="text/css" href="http://cdn.ggshow.com/styles/grayscale-all.css">
Grayscale selected:
<link rel="stylesheet" type="text/css" href="http://cdn.ggshow.com/styles/grayscale.css">
Grayscale print:
<link rel="stylesheet" type="text/css" href="http://cdn.ggshow.com/styles/grayscale-print.css">
Or using CSS import method:
Grayscale all:
@import url("http://cdn.ggshow.com/styles/grayscale-all.css");
Grayscale selected:
@import url("http://cdn.ggshow.com/styles/grayscale.css");
Grayscale print:
@import url("http://cdn.ggshow.com/styles/grayscale-print.css");